Hello to those out there that read my blog. I enjoy posting my projects for all to see to not only just share my ideas and projects with the world but to also help give others instruction on creating special projects. If you are looking at my blog whether it be for my doodling instructions in the very beginning which you will find at the very bottom of the page or looking at my cards, calendars and other altered projects. Please be sure to leave me comments and subscribe to my blog so you can get updates when I post new items that I have altered or created. I enjoy sharing with people, teaching new techniques and if you have ideas about something I can change I enjoy learning new techniques. As we all know scrapping and altering items is a growing and learning experience. So please be sure to leave comments, email me or even just subscribe to see the latest projects that I've made. I think us scrapbookers are a big family and can definitely learn from each other.
HAPPY SCRAPPING!!!
Monday, January 19, 2009
I LOVE YOU Valentine's Day Card


This is the third and last project that I completed yesterday. I had actually been working on this for a couple of days because I wasn't happy in the beginning how it was turning out and started it over a few times. This I LOVE YOU Valentine's Day card is up for auction on eBay right now. I used some fun glitter paper to make this. I was created not only created using DCWV glitter cardstock but using Best Occasions glitter paper. Best Occasions glitter paper is like those fun cards that you buy in the store that when you touch them you can feel the glitter cyrstals and sometimes they do come loose. It was fun yet messy to work with but the results are awesome. The card size is 5 1/2" x 5 1/2" and comes with a matching handmade envelope.
Harley Davidson 2009 Altered Calendar


Here is another project that I completed yesterday. This is one of the largest calendars that I do that I altered into a 2009 Harley Davidson Calendar. I used official EK Success Harley Davidson papers and embellishments on the project. I did want to use the motorcycle on an altered picture frame however I couldn't because it was too big, as well as being too for my medium sized calendars. Overall this calendar came out fantastic featuring orange flamed HD paper and then paper with logos of HD rides. I used orange ribbed ribbon to cover the separation of the two papers and then finished it off with the embellies. Of course since this calendar is bigger it took a little longer but overall came up with the same awesome result. This item is also presently up for auction on eBay.
Mickey Mouse 2009 Calendar


Here is a 2009 Mickey Mouse calendar that I completed last night...this calendar is presently available for sale on eBay. This calendar used the same techniques as all my other using Mod Podge specific cuts and then embellishments to complete. On this particular calendar since the Mickey Mouse epoxy sticker was see through I had to put it on white cardstock then adhere it to the page with Mod Podge and to give it more of a complete look I went around it with Christmas Red stickles to make it pop.
Sunday, January 18, 2009
Altered Picture Frame with Matching Card


I did this project last week. The frame was a wooden frame that was hot pink with fish bones on it that said I love my cat and I turned it into a beautiful "Baby Girl" picture frame and matching card for a perfect new baby gift. This item is presently up for auction on eBay in my store. If you are interested in step by step instructions please do not hesitate to send me a message. HAPPY SCRAPPING!!
Tinker Bell 2009 Pocket Calendar


This Tinker Bell 2009 Calendar was SOLD on eBay. This is another one of the many altered 2009 calendars that I will be making this month. Others to be made include Mickey Mouse & Friends, Harley Davidson, Floral design, The Little Mermaid, Disney Pixar Cars and many others. These calendars range in sizes from 3 3/4"x 6 3/4", to 5 1/4" x 7 1/2" and the largest 7 3/4" x 10 1/4". The completion of the calendar takes several hours and I have made many calendars to learn to get the folds exactly right however the finished product is definitely a beautiful way to go through the year. As I complete additional calendars I will post them in here and they will be available on eBay unless stated otherwise. HAPPY SCRAPPING!!!
Cinderella 2009 Pocket Calendar


This Cinderella Pocket Monthly Calendar is available in my eBay store. It was created using Sandy Lion Cinderella Paper and Provo Craft Paper and embellished with Prima Glitter Flowers, FX Ribbon, The Paper Studio Brads and Sandy Lion Chipboard Princesses. I used Mod Podge to adhere the paper to book as well as Cinderella to the cover, the flowers were adhered with hot glue. I used my Crop-a-dile to put a single eyelet in the back add a bookmark to the book and added a K&Company metal art tag that says "dream". If you are interested in this calendar it can be purchased in my eBay store under my "Favorite Links"
Saturday, January 17, 2009
Altered Coaster Holder Pics & Info


As
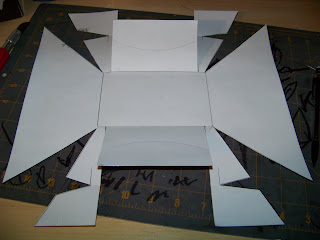 stated in the blog this coast
 er holder was created for a birthday gift for a friend of mine. Though it might not look like it was that hard to do it actually was. This piece took a lot of measuring and a lot of detailed cuts. For this project I used the following tools & products:
Products:
12x12 The Paper Studio Paper
Paper Studio Brads
Prima Glitter Flowers in Red & Black
Red 7/8" ribbed Creation Station Ribbon
and
Red 1/2" shiny FX Ribbon
Tools:
Mod Podge
Exacto Knife with fresh blade
1" foam brush
Hot Glue Gun w/all temp glue sticks
12" metal ruler
The paper as I stated in the blog was a measure like ten time cut once, for two reasons 1. I only get one shot at the alter & 2. because I only had one sheet of that paper. I based my cuts by measuring and outlining the item on the underside of the paper I did this by eye by wrapping it around the holder. I used a ruler for my angles and then cut with my exacto knife. I cut the basics first and then when it came to preparing to adhere I did one side at a time. To finish off the holder I hot glued the thinner ribbon on the exposed edge of the holder. I left tails at either side so it had a finished look and so it didn't peel away. I used the wider ribbon around the sides and this covered the tails of the thinner ribbon. I adhered the wider ribbon using 3M double-sided tape on the underside, wrapped it around the side and to close of the edges so it doesn't come undone and so it doesn't fray I added a bit of mod podge on the edges. The bow was made from the same ribbon and then hot glued in place. The brads were placed in the flowers before glueing them into place. And what comes up is the final product that you see.
Altered Coaster Holder
I created an altered coaster holder for a friend of mine for her birthday... of course her birthday was in December and it's taken me a long while to get this done but in my defense this was a one shot deal so I had to think about it before I actually did it. So since I only had one shot at it I went with the measure twice cut once theory however I actually measured like 10 times. Following you will see what it looked like before and then after and the progress of how I got it where it needs to be. I have many other projects that I've completed recently that I will be posting over the weekend and if you have any questions on any of them please do not hesitate to ask. HAPPY SCRAPPING!!
Thursday, January 15, 2009
The Etsy Store
Well my friends the Etsy.com Store was a bust so I'm sticking with eBay. For those of you who read my blog you will find my items in mine & my boyfriend's eBay store going-going-gone2u. I have made several projects that have been listed that I will picture here. If you have any questions on how I did any of my altered items please do not hesitate to ask.
Subscribe to:
Comments (Atom)
